Note: Although this was wrote for Alma Linux, its highly likely most, if not all, of the commands will work for most of the other Red-Hat based family of Linux distros.
I have written this guide step by step and dealing with one section at a time and as a result it is more long-winded than it needs to be. This could be condensed down into less commands by combining the different parts and doing them together such as the packages installs. However I have left it in a longer form to make it clear what the different steps that are involved are for people who are learning.
Install Nginx
Don’t forget to update the server
sudo dnf update -yThe first step is to to pull down and install the Nginx web server.
sudo dnf install nginx -yOnce Nginx has come down and been installed onto the machine you need to start & enable it to load on reboot:
sudo systemctl enable nginx
sudo systemctl start nginx
Open up firewall ports
Whether you are hosting yourself or running a VM in the cloud there are likely two different firewalls you need to approve the HTTP & HTTPS traffic through. The machine itself as well as the network firewall.
On your network firewall you need to allow TCP traffic through on ports 80 (HTTP) & 443 (HTTPS). You also need to allow traffic through your device firewall. To do this you need to add the following rules to firewalld your Alma Linux install.
sudo firewall-cmd --zone=public --add-service=http --permanent

sudo firewall-cmd --zone=public --add-service=https --permanent

 sudo firewall-cmd --reload
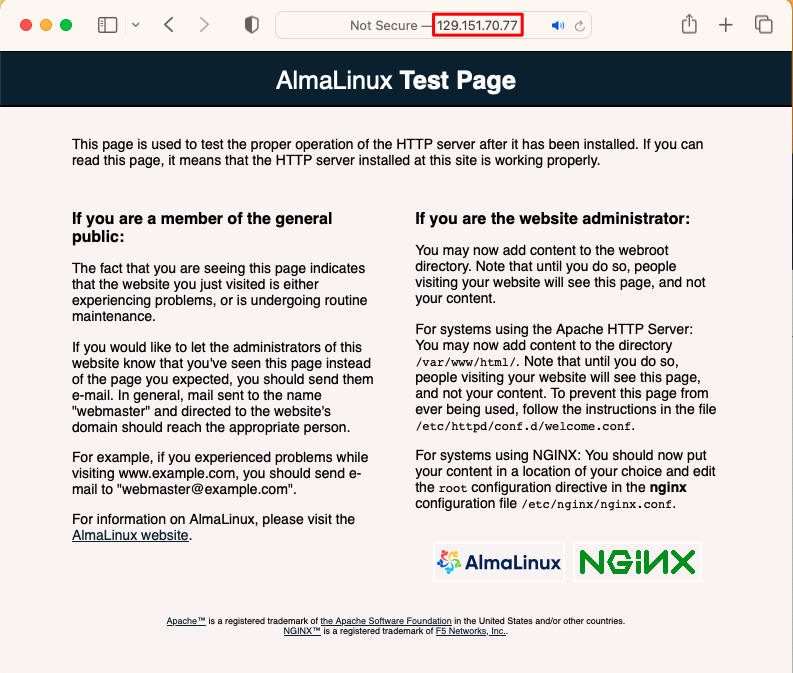
Once you have done this you should find that you can load the default Nginx page in your web browser by going to the computer’s public IP address. Note that it isn’t secure as you have not yet enabled SSL/TLS
Set your domain address to point to our server.
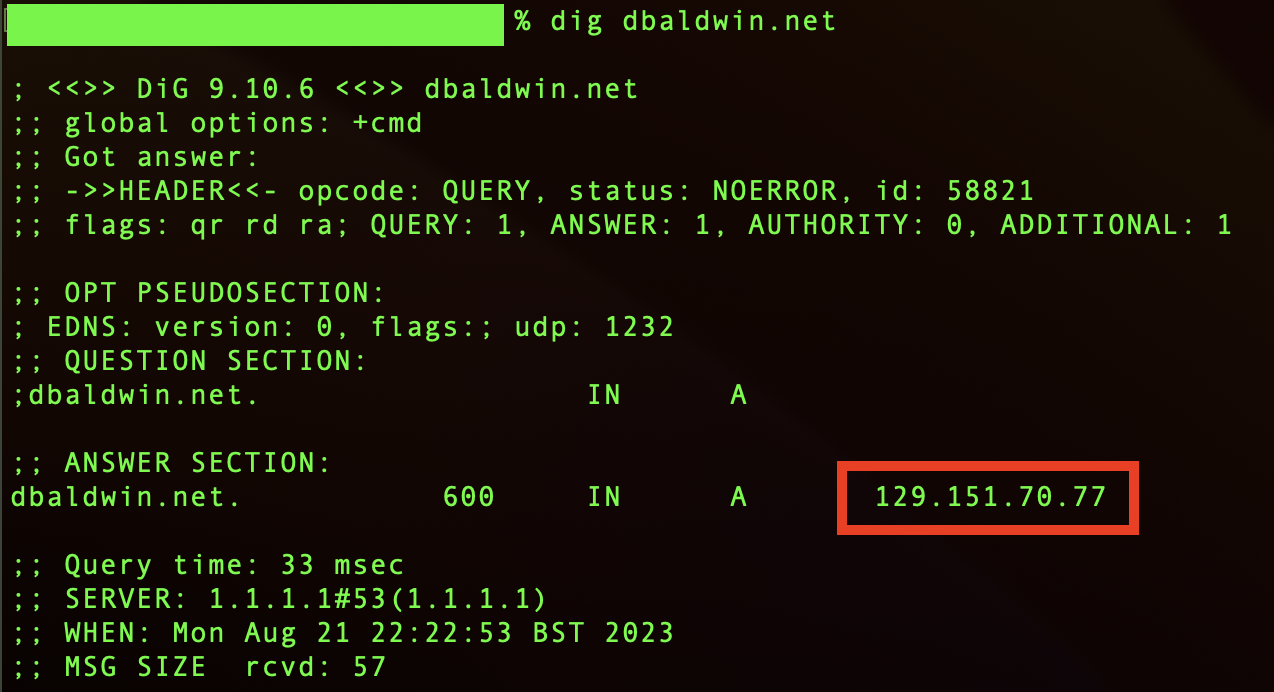
We need to set our domain address to have an A record to point to our server. It can take some time for the change to propagate around all the DNS servers across the internet. You may wish to also add a C Name for www. and point it to your A record.

On your personal computer you can use the dig or nslookup command to check if your DNS server records have changed and now points to your server’s IP address.
Once your DNS server has updated you should be able to load the Nginx test page via your domain name in your web browser.
Configuring Nginx to use our domain name
We need to edit some Nginx configuration files to enter in our domain name. I found my minimal version of Alma Linux does not have Nano installed so I had to use vi(m) for my text editing.
sudo vi /etc/nginx/nginx.confIf you are unfamiliar with vi/vim you need to learn a few key commands. Once it is open use the i key to enter edit mode. Once you are done with your edits and want to save press esc then type :wq (write and quit). If you have made a mistake and don’t want to save your changes type :q!
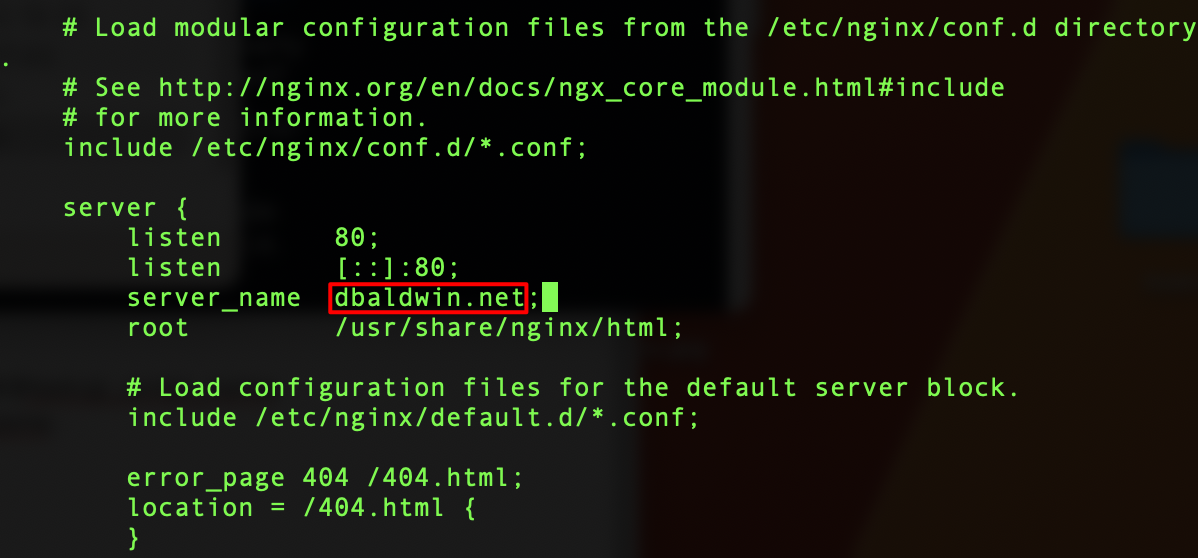
You can choose to change your website root here as well, however be aware that doing so you may experience permission issues with SElinux that you would need to resolve.
Setting UP HTTPS using Letsencrypt & Certbot
Probably the easiest way to get a TLS/SSL certificate is to use certbot, however we need to add the Extra Packages for Enterprise Linux Repository. Thankfully this is simple by using one command.
sudo dnf install epel-release -yNow we can install Certbot and the required Nginx plugin
sudo dnf install certbot python3-certbot-nginx -yNow that certbot has installed we can setup TLS encryption for our server:
sudo certbot --nginxIt will as you for an email address for urgent renewal notifications, feel free to enter an address you check regularly, then you will have to agree to the T&C’s and choose if you wish to join their mailing list. Finally you should be presented with your domain name to request a certificate for. you can just press enter here, or select the number.
You should get a message congratulating you for enabling HTTPS on your site, now you need to restart your Nginx server to allow it to start using your new certificate:
sudo systemctl restart nginxOptionally we can set Letsencrypt to auto renew the TLS certificates so that we don’t have to do this manually.
sudo systemctl start certbot-renew.timer && sudo systemctl enable certbot-renew.timerThat’s it! Congratulations your Nginx web server should be setup and working and you should now be ready to host your site.